HEX ezCAN configuration software
HEX ezCAN configuration software for Windows PC (released 2019-01-31, 4.8Mb)
HEX ezCAN configuration software for Mac (released 2019-01-31, 3.8Mb)
How to configure and operate your ezCAN
Getting started
Download and install the HEX ezCAN configuration software for your specific device. Once you have installed the HEX ezCAN device, use the USB cable provided to connect to it, then, open the HEX ezCAN configuration software.
Configuring accessories
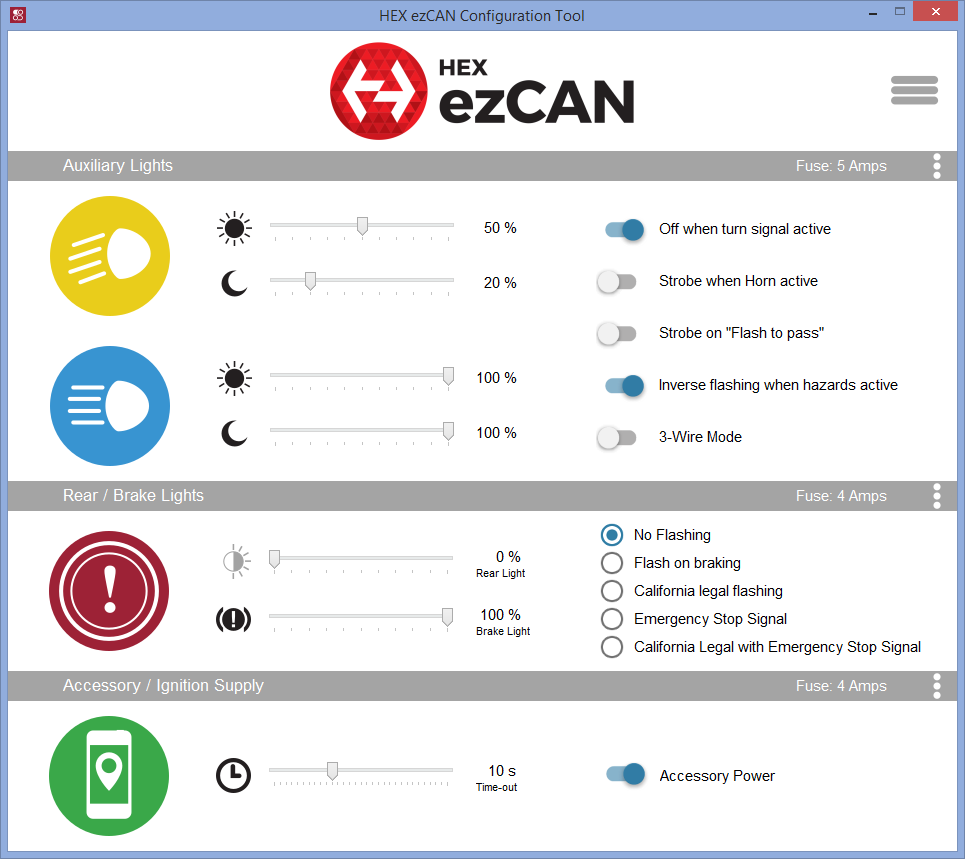
Configure the electronic fuses of the four outputs and select the functions of accessories according to your specific requirements. On the accessory channel, you can also set the delay time-out. Once you switch the ignition 'OFF', the accessory output channel will remain powered for the period of your preset delay time-out before powering down.
Setting the fuses
Use the drop-down menu on the right to set the electronic fuse for each output channel. Select the appropriate fuse level for each accessory. The initial fuse settings are preset but can be changed according to your requirements. Double-check the Amps the accessory will draw and set the fuse level accordingly.
Configuring the lights
There is a day-night sensor on the instrument cluster. For safety and visibility reasons, the bike's lights conform to the different presets for day and night riding - based on readings from the day-night sensor.
The HEX ezCAN extends this functionality to the accessory lights so that their brightness can be set separately for day and night, dim ![]() and bright
and bright ![]() . The sun slider (☀) sets the brightness for day riding, while the moon (☾) slider sets the brightness for night riding. Dim
. The sun slider (☀) sets the brightness for day riding, while the moon (☾) slider sets the brightness for night riding. Dim ![]() and bright
and bright ![]() settings are done individually, hence the two different icons.
settings are done individually, hence the two different icons.
All lights can be activated or deactivated by holding in the turn signal cancel button (For R1200 LC & K1600) or trip / info button for ( F800 & R1200) for 3s (i.e. toggle on and off). If configured, the auxiliary and horn outputs will remain active when the lights are deactivated.
Four additional options for auxiliary lights:
- Off when turn signal active: Turns the corresponding accessory lights off when a turn signal (indicator) light is active. This prevents the turn signal from disappearing in the brightness of accessory lights.
- Strobe when horn is active: Strobes the accessory lights when the horn is active.
- Strobe on "flash to pass": Strobes the accessory lights 3 times when "flash to pass" is activated by pressing the high-beam headlight flash button 3 times in quick succession.
- Inverse flashing when hazards active: This flashes the hazards and forward-facing auxiliary lights alternately, preventing hazards from disappearing in the brightness of accessory lights and adding extra visibility to oncoming traffic.
- 3-Wire Mode (F800 & R1200 only): If you are using three wire auxiliary lights, switch this mode on for dimming to work correctly. Note that in channel configuration 1 & 2 both auxiliary lights turn of when the indicator is on and it is not possible to control the lights separately in 3-wire mode.
Control brightness via BMW Motorrad MultiController (Wonder Wheel / Selector Wheel)
The MultiController can be used to adjust the brightness of the forward-facing auxiliary lights. Hold MultiController left for more than 3s to activate this function, rotate up and down to adjust the brightness of current setting. When done, the configuration mode will timeout after 10s of no activity on the MultiController. The brightness setting can also be cancelled by holding the MultiController to the right for more than 3s. There is currently no way to dynamically change or adjust brightness of lights from the motorcycles control while riding the F800 and R1200.
Configuring the rear and brake lights
Brightness: The rear light brightness slider sets your accessory rear light's brightness between 0 - 100%. The brake light brightness slider sets your accessory brake light's brightness between 0 - 100%. If the accessory brake light is set to a type of flashing, this will determine the brightness of the flash.
Rear light vs brake light. The rear light is always on when the ignition is ON - but an accessory rear light can be turned off even when the ignition is ON. The bike's brake light is only activated on active braking - but an accessory brake light can be set to activate on other types of trigger too, like harsh deceleration. Be aware that an overly bright rear light setting can make a brake light less visible - an effect that can partly be countered by flashing. (See NOTE 1)
Five additional options for accessory brake lights:
- No flashing: On braking the accessory brake light comes on at preset brightness and does not flash (mimics the bike's standard brake light)
- Flash on braking: Accessory brake light flashes to preset brightness under any active braking
- California 4Hz legal flashing: When braking, the accessory brake light flashes 4 times at 4Hz to the preset brightness and then remains on for the duration of active braking. So once the brakes are applied, the auxiliary brake light will flash 4 times within a second, then remain on until the brake is released. [See full legal requirement. 25251.5. (c)]
- Emergency stop signal: Accessory brake light flashes whenever deceleration above 21km/h/s (kilometres per hour per second) is detected, either from active braking or engine braking. (See NOTE 2 for more information)
- California legal with Emergency stop signal: The accessory brake light behaves as a combination of "California 4Hz legal flashing" as well as "Emergency stop signal". This means that under normal braking it will flash 4 times at 4 Hz and then remain on. In addition, it will also flash whenever the deceleration is larger than the preset harsh deceleration value. Please see options (3.) and (4.) above.
NOTE 1: The bike's brake light is always brighter than the rear light, but an accessory brake light can use the same LEDs for both rear and brake lights. It is important to remember that the brightness setting for the accessory rear light should be substantially less than the brightness setting of the accessory brake light to indicate braking
NOTE 2: Emergency braking will only activate above 50km/h. If you decelerate harshly (over the 21km/h/s threshold) and keep brake applied, the light will flash and continue to flash until the brake is released. If you tap-off (i.e. release the throttle, no brake applied), it will flash as long as the speed is over 50km/h and the deceleration is over the threshold. The two cases are:
- Firstly, braking hard for an evasive manoeuvre, to warn traffic behind you to be aware that you have suddenly decelerated harshly - the accessory brake light keeps flashing as long as the brake is applied, and will continue to flash when the bike has stopped. The only way to stop if flashing is to release the brake.
- Secondly, two riders riding along at high speed, and the rider in front taps off - a short burst of accessory brake light flashes will be seen while the deceleration is over 21km/h/s so that the rider behind knows to be cautious - even though the rider in front did not apply his brake.
Setting the time-out of the accessory / Ignition supply
To avoid power cuts to the accessories connected to this output during ignition cycles, use the slider to set the preferred time-out delay .
Channel mapping
If this is your first installation and configuration of the HEX ezCAN, ensure that your HEX ezCAN configuration software corresponds with the way the HEX ezCAN outputs are configured with the accessories. This is called channel mapping.
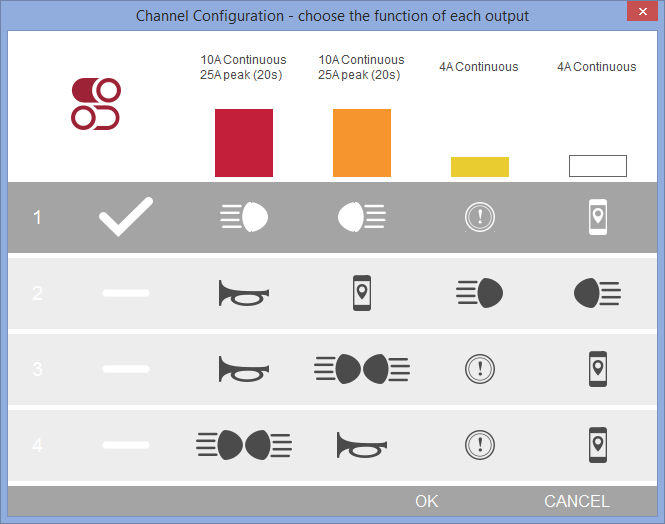
Choose the configuration of accessories that you would like to install.
Open the channel mapping window of the HEX ezCAN configuration software. Use the drop-down window top-right to view different output configurations, select the one that matches your installation and click OK.

Channel mapping icons explained.